
Set Up Single Sign-On
Allow users to sign in using their credentials from an external identity provider.
Set up single sign-on (SSO) to enhance security and simplify user access by allowing users to sign in with their existing credentials from an identity provider (IdP). Visier supports multiple SSO configurations including integration with multiple IdPs simultaneously. Visier supports IdP-initiated single sign-on processes, so any IdP that supports SAML 2.0 can be used. For more information, contact Technical Visier Support.
Note:
- You may need help from your IT administrator to set up single sign-on.
- We recommend that you set up a call with Visier Support to assist you through the SSO configuration. Users may be locked out if SSO is enabled with an invalid or untested configuration.
Set up single sign-on with your identity provider
Before you set up single sign-on, you will need to configure your SAML 2.0 settings with your IdP. Use the following information as guidance for configuring the SAML 2.0 assertion:
General settings
- Service Provider: Visier Analytics
- Service Provider Endpoint: https://vanityname.visier.com/VServer/auth
Note: Replace vanityname with your vanity URL domain.
- Single Logout Endpoint (Optional): https://vanityname.visier.com/VServer/auth/logoffWithSaml
Note:
- Replace vanityname with your vanity URL domain.
- This is required to enable single logout (SLO). If your IdP does not have a distinct setting to enable SLO, you can enable SLO by providing the above URL. To disable SLO in this case, just remove the SLO URL. If your IdP does have a setting to enable SLO, you must enable the setting and provide the above URL.
- Unique identifier for users: The NameID attribute should be mapped to the username field in Visier.
- Secondary information to be passed to Visier pertaining to user accounts: Nothing specific to user accounts, but we need to know the Issuer URL for SSO to work.
- Tenant code: If you're an administrating tenant, the tenant code for the tenant you're setting up SSO for needs to be included the SAML assertion. Let's say you have the following tenant hierarchy structure, where WFF_j1r is the tenant code for the administrating tenant and WFF_j1r~i1o is the tenant code for one of its analytic tenants.
- If you're setting up SSO for users at the administrating tenant level, the SAML assertion should have tenantcode=WFF_j1r
- If you're setting up SSO for users at the analytic level, the SAML assertion should have tenantcode=WFF_j1r~i1o
Security settings
The assertion must be signed with one of the following algorithms:
- RSA-SHA256
- RSA-SHA1
- DSA-SHA1
Tip: We recommend RSA-SHA256 as the signing algorithm because it is the most secure.
Issuer and certificate information
- NameID format expected by Visier: Standard format. This should be the username field in Visier, which is usually an email address. For example, john.doe@acmeinc.com
Note: NameID format for administrating tenants
If you're an administrating tenant, the NameID format differs depending on whether you’re setting up SSO at the administrating or analytic tenant level.
- At the administrating tenant level this is usually an email address. For example, john.doe@acmeinc.com
- At the analytic tenant level this is usually a universally unique identifier (UUID). For example, 8987kcny-tas19tk89@WFF_j1r~1l0
- NameIDPolicy: Unspecified, transient.
- Type of SSO initiation: IdP Initiated.
- Creation of user accounts: User accounts can be loaded from a file or created manually. Auto-provisioning is also available. For more information, see Auto Provisioning.
- Deactivation of user accounts: Deactivate user accounts via the solution.
- Self-signed certificates: Supported.
- SAML single logout: Supported. If enabled, users who sign out of their IdP site are also signed out of Visier.
- Session timeout limit: Yes. This can be adjusted in the SAML assertion. The following is an example of a three hour session:Copy
<saml2:SubjectConfirmationData NotOnOrAfter="2015-01-26T11:40:56.109Z" Recipient="https://vanityname.visier.com/VServer/auth"/>
</saml2:SubjectConfirmation>
</saml2:Subject>
<saml2:Conditions NotBefore="2015-01-26T08:40:56.109Z" NotOnOrAfter="2015-01-26T11:40:56.109Z">
SAML assertion parameters
A list of parameters typically included in the SAML assertion
|
Parameter |
Description |
Type |
Required |
|---|---|---|---|
|
X509Certificate |
A digital document that securely associates a key pair with your identity. This certificate authenticates your session. |
string |
Required |
|
Issuer |
The SAML assertion's issuer, such as your IdP URL. |
string |
Required |
|
nameID |
The tenant user's username within Visier's system, such as a unique email address associated with a user. For example, 12345.WFF_j1r~c7o@jupiter.com. |
string |
Required |
|
userEmail |
The tenant user's email address within Visier's system. This is the user's preferred email address for receiving email content from Visier. For example, jane@callisto.com. |
string |
Required |
|
displayName |
The user's full name.
If the |
string |
Optional |
|
tenantCode |
The tenant code within Visier’s system. For example, WFF_j1r~c7o. |
string |
Required |
|
Recipient |
Visier's SSO endpoint URL. https://{vanity-name}.visier.com/VServer/auth/authenticateWithSaml |
string |
Required |
|
Audience |
Visier's SSO endpoint URL. https://{vanity-name}.visier.com/VServer/auth/authenticateWithSaml |
string |
Required |
|
SessionNotOnOrAfter |
A timestamp defining the maximum validity of a Visier session. |
string |
Optional |
| locale |
The tenant user's preferred locale in the IETF BCP 47 language tag format. If specified, the locale attribute value is resolved to a locale supported by Visier and stored in the user’s preferences. This overrides any existing language preference that the user may have selected. If you enter an unsupported locale, Visier's default locale is en. For example, if you enter the unsupported locale If you enter a detailed locale variant like Supported locales:
|
string |
Optional |
<samlp:Response xmlns:samlp="urn:oasis:names:tc:SAML:2.0:protocol" ID="_8b1ef66dd37707261b2e" Version="2.0" IssueInstant="2018-08-30T23:46:52Z" Destination="http://jupiter.visier.com/VServer/auth/authenticateWithSaml">
   <saml:Issuer xmlns:saml="urn:oasis:names:tc:SAML:2.0:assertion">
       https://jupiter.idp.com
   </saml:Issuer>
   <samlp:Status>
       <samlp:StatusCode Value="urn:oasis:names:tc:SAML:2.0:status:Success"/>
   </samlp:Status>
   <saml:Assertion xmlns:saml="urn:oasis:names:tc:SAML:2.0:assertion" Version="2.0" ID="_SI3PNv7Cat4fBASmwqdCHpgtRj4QtLfT" IssueInstant="2018-08-30T23:46:52.922Z">
       <ds:Signature xmlns:ds="http://www.w3.org/2000/09/xmldsig#">
           <ds:SignedInfo>
               <ds:CanonicalizationMethod Algorithm="http://www.w3.org/2001/10/xml-exc-c14n#"/>
               <ds:SignatureMethod Algorithm="http://www.w3.org/2001/04/xmldsig-more#rsa-sha256"/>
               <ds:Reference URI="#_SI3PNv7Cat4fBASmwqdCHpgtRj4QtLfT">
                   <ds:Transforms>
                       <ds:Transform Algorithm="http://www.w3.org/2000/09/xmldsig#enveloped-signature"/>
                       <ds:Transform Algorithm="http://www.w3.org/2001/10/xml-exc-c14n#"/>
                   </ds:Transforms>
                   <ds:DigestMethod Algorithm="http://www.w3.org/2001/04/xmlenc#sha256"/>
                   <ds:DigestValue>
                       BOzuMvpBUGbnhp+JfygodVx5aX1Jmvi5P7jphZV36e8=
                   </ds:DigestValue>
               </ds:Reference>
           </ds:SignedInfo>
           <ds:SignatureValue>
               a/4DP6QkBv1YIz71JeghbX12I6ba+pl7BHUyRzP80Lwu2BBYrgWbCDrtzaS113HIkYkpD01qnyh4+/OMdBjMJkL61h/Z6ZrjNCi4QfMx2B1M2+XNiQGMvWygZdIuOzxOvJD1/xGqs82444+7l9j1xo0gIqRGMhwnKTVP5gPUUPvPNQzPosxzxSH64J0wXd87pVkkLSE/iK5AXooATsPYxwSd4rBKuxLg29SDyW3lnHr5dSoKmSsgVWbj4bUDGbK0gprRu0LwEiKnvqv8VJU/2sGSFucWT6n5N7SGHEuIIpVl81my7jIbc6vk5Vf6SEaQkbpKZE9cm95OOjRX6OuzAA==
           </ds:SignatureValue>
           <ds:KeyInfo>
               <ds:X509Data>
                   <ds:X509Certificate>
                       MIIC+jCCAeICCQCCGzRFLDFnaDANBgkqhkiG9w0BAQUFADA/MQswCQYDVQQGEwJDQTELMAkGA1UECAwCQkMxEjAQBgNVBAcMCVZhbmNvdXZlcjEPMA0GA1UECgwGVmlzaWVyMB4XDTE4MDYwOTA2NDcyN1oXDTE5MDYwOTA2NDcyN1owPzELMAkGA1UEBhMCQ0ExCzAJBgNVBAgMAkJDMRIwEAYDVQQHDAlWYW5jb3V2ZXIxDzANBgNVBAoMBlZpc2llcjCCASIwDQYJKoZIhvcNAQEBBQADggEPADCCAQoCggEBAKqeZZXPkZgRpkLLoFzO1FosFctYsDTqKy6qsdp8DFJg25ulO/uFFR+pibyitcRRUgCxE7QS9O1MO9KVSGnMEFYBQApx02nYKOpZdnvYkjBdAZknVx/+5S/mBZ5ywHS77oWyvEjCvIpXonc9q8Az+PcTsTRmmhkICXqHF5PJltmeTv4nq8hIpaajMTZdvAjfxFOc/b1eAfdYrH9eQxY1GllTv/JhuVfP1fY5p3CpAyWun365rWNNF+aTgIltf/qkvP6Fleug/az+kxonECZrWm9ryZbXHnkJblds1Z0FIxOP2CPdIkh1Plo3TtE60AnTeSyMJTGl2F0ttGTL3fN6uxECAwEAATANBgkqhkiG9w0BAQUFAAOCAQEAYnk353ZXG/5ElowpjAMoCddU/yl9WxqMmNPnVY+t6xYbq6Mg6P7deLQ1vw2uTi1KgRFUUklamAwhLMqrHMJnWMNTZmlOsaVlH81P6dwtqxyI7nttpDVK0sLGRP3j0TnzTyPMyqFdXAiSJULVJwLCdIQAz7NInsWKYp+nzLc9a7ve1fgSPkhrrpDoddhWoSniatbI9iHJ+/fr0XOghk9yMzQF0kvmtkKGKpdZbpMYerBT+lZ9zIY+B6vomFva0lhKdRSvd8wsIa8MMUycI4oZDSRvbzfPHlwXMiE0mB3vMFdfIBEuw9xMvnk6wMb89fj8sxMDckB9TuLu1jX4LqHvNA==
                   </ds:X509Certificate>
               </ds:X509Data>
           </ds:KeyInfo>
       </ds:Signature>
       <saml:Issuer>
           https://jupiter.idp.com
       </saml:Issuer>
       <saml:Subject>
           <saml:NameID Format="urn:oasis:names:tc:SAML:1.1:nameid-format:emailAddress">
               ceo@jupiter.com
           </saml:NameID>
           <saml:SubjectConfirmation Method="urn:oasis:names:tc:SAML:2.0:cm:bearer">
               <saml:SubjectConfirmationData NotOnOrAfter="2018-08-31T00:46:52.922Z" Recipient="http://jupiter.visier.com/VServer/auth/authenticateWithSaml"/>
           </saml:SubjectConfirmation>
       </saml:Subject>
       <saml:Conditions NotBefore="2018-08-30T23:46:52.922Z" NotOnOrAfter="2018-08-31T00:46:52.922Z">
           <saml:AudienceRestriction>
               <saml:Audience>
                   http://jupiter.visier.com/VServer/auth/authenticateWithSaml
               </saml:Audience>
           </saml:AudienceRestriction>
       </saml:Conditions>
       <saml:AuthnStatement AuthnInstant="2018-08-30T23:46:52.922Z" SessionNotOnOrAfter="2018-08-31 T23:46:52.922Z" SessionIndex="614491951">
           <saml:AuthnContext>
               <saml:AuthnContextClassRef>
                   urn:oasis:names:tc:SAML:2.0:ac:classes:PasswordProtectedTransport
               </saml:AuthnContextClassRef>
           </saml:AuthnContext>
       </saml:AuthnStatement>
        <saml:AttributeStatement xmlns:xs="http://www.w3.org/2001/XMLSchema"        xmlns:xsi="http://www.w3.org/2001/XMLSchema-instance">
            <saml:Attribute Name="tenantCode"           NameFormat="urn:oasis:names:tc:SAML:2.0:attrname-format:basic">
               <saml:AttributeValue xsi:type="xs:string">WFF_j1r~c7o</saml:AttributeValue>
           </saml:Attribute>
            <saml:Attribute Name="userEmail"           NameFormat="urn:oasis:names:tc:SAML:2.0:attrname-format:basic">
               <saml:AttributeValue xsi:type="xs:string">jane@callisto.com</saml:AttributeValue>
           </saml:Attribute>
            <saml:Attribute Name="locale"           NameFormat="urn:oasis:names:tc:SAML:2.0:attrname-format:basic">
               <saml:AttributeValue xsi:type="xs:string">de</saml:AttributeValue>
           </saml:Attribute>
       </saml:AttributeStatement>
   </saml:Assertion>
</samlp:Response>
Set up single sign-on in Visier
Note: SSO for Embedded Partner Administrators
- We recommend that Embedded Partner Administrators set up SSO in the administrating tenant to promote consistency with your analytic tenant user experience. If you set up SSO only for your analytic tenants, sign in to the administrating tenant using this URL: https://{vanity-name}.visier.com/VServer/auth/admin.
- For instructions on how to configure SSO in analytic tenants, see Set up single sign-on for your analytic tenants.
- Do one of the following on the global navigation bar:
- Click Settings > Single Sign-On.
- If you're an administrating tenant, click Settings > Partner Single Sign-On.
- Click Create New SSO Configuration in the upper-right corner of the SSO Configurations list.
- In the Create New SSO Configuration dialog, type the value found in the issuer claim within a SAML assertion, often referred to as the Entity ID in the Issuer box, and then click Create. The issuer uniquely identifies the identity provider within the solution and should match what was provided as part of the assertion during sign-on events. The Issuer cannot be changed. If you need to change this field, you will have to create a new configuration.
- In the SSO Configuration, enter the following information:
- Display name: The name of the SSO option that is shown to users on the Visier sign-in page when there are multiple SSO configurations.
- Description: Information about the SSO option that is shown to users on the Visier sign-in page when there are multiple SSO configurations. Provide a clear description to help users identify the right option. For more information, see Sign in with multiple SSO configurations.
- Login URL: The URL generated by the IdP that users will use to access Visier.
- Logout URL (Optional): The URL that users will be directed to after they sign out.
- Certificate: The X509 certificate that was used to sign the SAML assertion. SAML assertions should be signed but not encrypted.
- Issuer: The value found in the issuer claim within a SAML assertion, often referred to as the Entity ID. The issuer uniquely identifies the identity provider within Visier and should match what was provided as part of the assertion during sign-on events. This was provided when the configuration was created and cannot be changed.
- Parameters (Optional): Any additional parameters required by the IdP. These parameters must be URL encoded.
- Click Save to create the configuration.
-
Go back to the list of SSO configurations by doing one of the following in the navigation path at the top of the page:
- Click Single Sign-On .
- If you're an administrating tenant, click Settings > Partner Single Sign-On.
- Optional: Create additional SSO configurations for different user groups or identity providers.
- Optional: Enable auto-provisioning to automatically create user accounts for new users who access Visier from your SSO portal. For more information, see Auto Provisioning.
Note: Auto provisioning is not supported at the administrating tenant level. Administrating tenants can only auto provision new users for analytic tenants.
- Optional: To exclude specific users from SSO, add users to the Bypass Users list. Selected users can bypass SSO and use their existing username and password to sign in to Visier with the following URL: https://{vanity-name}.visier.com/VServer/auth/admin. To complete the sign in process, users will be asked to enter a verification code that is sent via email.
Tip:
- To avoid being locked out while setting up SSO, we recommend adding an administrator to the Bypass Users list.
- Users who sign in to Visier with a username and password must verify their email address. Email validation does not apply to users who sign in to Visier with SSO.
- When finished, turn on the Enable SSO toggle.
Note: Contact Visier Technial Support to turn off SSO. If SSO is turned off, users need a Visier account and password to sign in. Users can reset their password from the sign-in page. However, they may require assistance with account setup and password resets.
Set up single sign-on for your analytic tenants
You can have multiple SSO configurations to support multiple IdPs for your analytic tenants. If SSO is enabled, existing tenants that don't have assigned SSO providers will accept authentication from any of the configured IdPs. SSO provides a seamless user onboarding experience and adoption for your analytic tenants.
- On the global navigation bar, click Settings > Tenant Single sign-on.
- Click Create New SSO Configuration in the upper-right corner of the SSO Configurations list.
- In the Create New SSO Configuration dialog, type the value found in the issuer claim within a SAML assertion, often referred to as the Entity ID in the Issuer box, and then click Create. The issuer uniquely identifies the identity provider within the solution and should match what was provided as part of the assertion during sign-on events. The Issuer cannot be changed. If you need to change this field, you will have to create a new configuration.
- In the SSO Configuration, enter the following information:
- Display name: The name of the SSO option that is shown to users on the Visier sign-in page when there are multiple SSO configurations.
- Description: Information about the SSO option that is shown to users on the Visier sign-in page when there are multiple SSO configurations. Provide a clear description to help users identify the right option. For more information, see Sign in with multiple SSO configurations.
- IdP URL: The URL that users will be directed to sign in. This URL will post a valid SAM assertion to Visier and is generated by your SSO solution (IdP).
- Logout URL (Optional): The URL that users will be directed to after they sign out.
- Certificate: The X509 certificate that was used to sign the SAML assertion. SAML assertions should be signed but not encrypted.
- Issuer: The value found in the issuer claim within a SAML assertion, often referred to as the Entity ID. The issuer uniquely identifies the identity provider within Visier and should match what was provided as part of the assertion during sign-on events. This was provided when the configuration was created and cannot be changed.
- Parameters (Optional): Any additional parameters required by the IdP. These parameters must be URL encoded.
- Click Save.
- Go back to the list of SSO configurations by clicking Tenant Single Sign-On in the navigation path at the top of the page.
- Optional: Create additional SSO configurations for different user groups or identity providers.
- Optional: Enable auto-provisioning to automatically create user accounts for new users who access Visier from your SSO portal. For more information, see Auto Provisioning.
- When finished, turn on the Enable SSO toggle.
Sign in with multiple SSO configurations
When multiple SSO configurations are available, the platform cannot always automatically determine the right configuration to use. In these cases, users are directed to a generic Visier page where they have to manually select the SSO configuration before they're redirected to the IdP URL.
The options available on the page will depend on whether SSO is configured and enabled for the administrating tenant.
If SSO is not enabled for the administrating tenant, users will only see the list of analytic tenant configurations. Partner admins can sign in to the administrating tenant using this URL: https://{vanity-name}.visier.com/VServer/auth/admin.
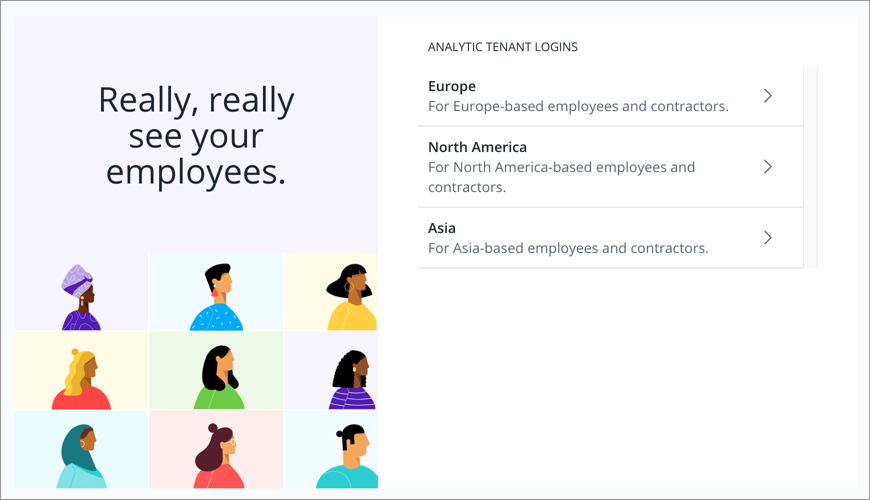
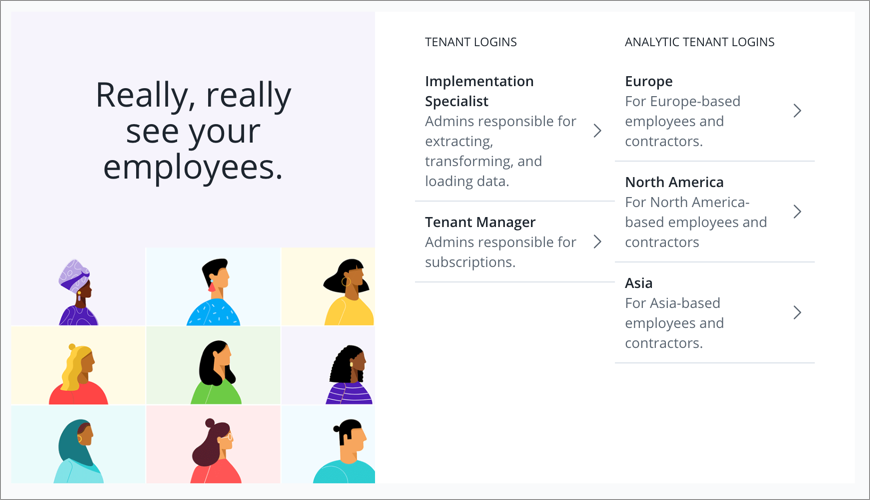
If SSO is enabled for the administrating tenant, users will see a list of tenant and analytic tenant configurations:
- To sign in to the administrating tenant, Partner admins should select an option from the Tenant Logins list.
- To sign in to the analytic tenants, users should select an option from the Analytic Tenant Logins list.
Frequently asked questions
Is there a metadata file that can be consumed in our IdP to configure the integration?
No. There is no metadata file. However, the only Visier specific information needed to set up SSO with your identiy provider is the Service Provider Endpoint. You can find this in the IdP configuration in Studio by clicking Settings > Single Sign-On on the global navigation bar. The Service Provider Endpoint should be in the following format: https://vanityname.visier.com/VServer/auth
Is Just-in-Time (JIT) or SCIM provisioning supported?
Visier supports JIT provisioning. For more information, see Auto Provisioning. If auto provisioning is enabled, when a user attempts to sign into Visier, a user account will automatically be created for them if a username does not already exist matching the NameID sent. SCIM provisioning is supported in limited availability. For more information, see Set Up SCIM.
Is Multi-Factor Authentication (MFA) supported?
As an IdP-initiated connection, the sign in is initiated via the Identity Provider and any steps required by the end user as part of the authentication process is irrelevant from Visier’s perspective. Once any required steps are completed, the only requirement is that the IdP sends the SAML on to Visier.
Is a Sandbox/QA environment available to test the SSO integration prior to go-live?
No. We do not provide an environment for SSO testing.
How do users access Visier once SSO is set up?
When users navigate to the sign in page in their browser they will be seamlessly taken to the IdP to authenticate at the Login URL that you defined. Once authenticated, users will be redirected to Visier and signed in.
Once enabled can users only connect via SSO?
Exceptions can be made. For example, if you want to have a backup in case a certificate expires or there is an issue with the IdP. You may also have contractors that cannot be added to the IdP due to internal controls. In these cases, you can add users to the Bypass Users list when you set up SSO in Visier. It is a good idea to have an administrator on the list to avoid being locked out when you make changes to SSO. Bypass users can sign in to Visier independent of SSO. They will be redirected to a different sign in URL, enter their credentials, and asked to enter a verification code that is sent via email.
How can I troubleshoot if a user cannot sign in via the IdP?
When a user attempts to sign in to Visier via SSO, and is unsuccessful, there are two potential outcomes.
If the user is redirected to a generic Visier page requesting the user’s username and password, the request was passed on to Visier successfully via the IdP, but the SAML contents do not match what Visier expects. For example, the NameID sent does not match a user’s username in Visier, or the certificate or issuer sent does not match the expected values defined in Visier.
If the user encounters an error, or is redirected to a non-Visier landing page, the issue is on the IdP-side. Either the user is not configured to allow access to Visier (in the wrong user group) or an incorrect Login URL was entered in Visier to support IdP-initiated connections.